

Looking to give your audience a unique viewing experience? Want to stream with friends without causing your viewers to use twice the bandwidth by watching two streams? Using our RTMP Source feature, turn your stream into a collaboration using Studio in combination with your usual broadcasting software!
Setting up your first multiplayer stream
Our multiplayer setup will be pretty simple. We’ll be creating 2 RTMP Ingests inside of Studio. Once these are made we can use any broadcast software in order to start broadcasting to them.Using this setup we’ll be utilizing Lightstream in order to combine everything into a single output!
The first step you’ll want to take is getting your RTMP Sources all set up. To do this, simply click the green Add Layer button and select “RTMP Source” where you’ll be brought to view all your RTMP Sources. On this screen, click “Create New RTMP Source” in order to create a source for each player you’d like to be shown on stream. Clicking on any of these sources will add them to your current scene where you can position them however you’d like.
Broadcasting your multiplayer stream to Go Live

To broadcast to these sources, you’ll just need to grab the Ingest url listed. Each player will use that for their “Server” inside of their desktop broadcast software (in our case, OBS) and use the Stream Key for the RMTP Source you’d like to broadcast to. When broadcasting to RTMP Sources, we suggest a resolution of 1280×720 as the max and a bitrate of 3000-3500 dependant on the content you’re streaming. Once everything is set, when you go live in your broadcast software, you’ll see a live preview of your stream in your RTMP Source inside of Lightstream! At this point, your stream isn’t live to your channel but is being fed into Lightstream Studio.
For a simple setup, we’ve also included a couple of premade multiplayer overlays to get you started. You can find those by using the Add Layer button, clicking “Image”, and navigating to the “More overlays >” section.
Looking for some templates to make your own multiplayer overlays? You can find them HERE.
Setting a BRB screen for your guest
Finally, we’re going to set up one more scene for when player 2 needs to go afk. We can do this by clicking the “Add Scene” button at the bottom. This can be used to set up different points of view, brb screens, and more!

After you’re all set up, you’re ready to go live by simply clicking the “Go Live” button. Make sure to set your Game and Title first!

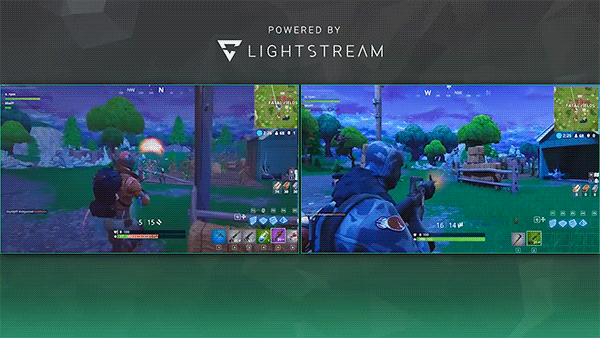
And this is what your audience will see:
Useful features
Here’s some of the features that you might want to take advantage of when doing a multiplayer stream with Studio:
Guest Feature: Using our guest feature you can chose to bring in a friend’s webcam independent from their gameplay allowing for more creative layouts and broadcasts
Fullscreen Alerts: You can lay out your alerts, overlays, and integrations along the edges or make them take up the full broadcast. Get crazy
Multiple Scenes: Set up solo modes, a different point of view, brb screens, and more and switch between them at will
More Platforms: Bring your multistreams to YouTube, Facebook, or even your own website with our Custom RTMP Destination option.
Integrated chat and stream preview: No more need for multiple tabs for your dashboard, chat, and stream preview. One page to rule them all